Pages

Monday 30 July 2012

18. Pokeball Three Netball

omg hi everyone, guess wut?

I FINALLY GOT AROUND TO FINISHING THE 3RD POKEBALL!!!! XD

sorry the caps lock was on and I was too lazy to turn it off :P but here's a quick pic of the third one


This is a net ball.  :O so surprising eh? (<--- super canadian XD)

Anyways, so you all know how Tiffany did pokeball nail tutorials? Yea I'm making these pokeballs according to her nails. >u<

Currently I have 2/5 done so I'm almost half way there. *inserts Bon Jovi's Livin' on a Prayer* ^ u ^

Yea ummmm ... so here the other three are. Yes I'm sure I haven't miscounted the Pokeballs, I have three, but the pika ball isn't part of Tiff's nail collection so that's why I only say I'm done two.


 This is the PikaBall


This is the Regular Pokeball


Enjoy :)
Caitlyn

Thursday 26 July 2012

17. Assorted Pokeball Nails

Errrr.... well i kinda got lazy and busy with summer school work T^T so i decided to bunch the last 4 tutorials together or else you may have never seen them in the next 2-3 months xP well maybe not thatttt long but defiantly not in this month!
Anyways on my right hand i did different pokeballs... A great ball, ultra ball, net ball and premier ball. Why these? well after the basic pokeball the next two well know are, of course, the great ball then ultra ball! so of course they would be here... but i have to say i painted the net ball and premier ball because i thought they would be easy ">.>

Sorry my left handed painting skills suck... errr... let's begin...

Polish
  • Base and Top Coat
  • White - O.P.I. Alpine Snow
  • Black - Eleanor
  • Dotting tool
  • Nail Brush
  • Great Ball
    • Blue - Sally Hansan Xtreme Wear Blue Me Away
    • Red - China Glaze Poinsettia
  • Ultra Ball
    • Yellow - Sally Hansan Xtreme Wear Mellow Yellow
  • Net Ball
    • Blue-green (sorry i used green - O.P.I. Green-wich Village)
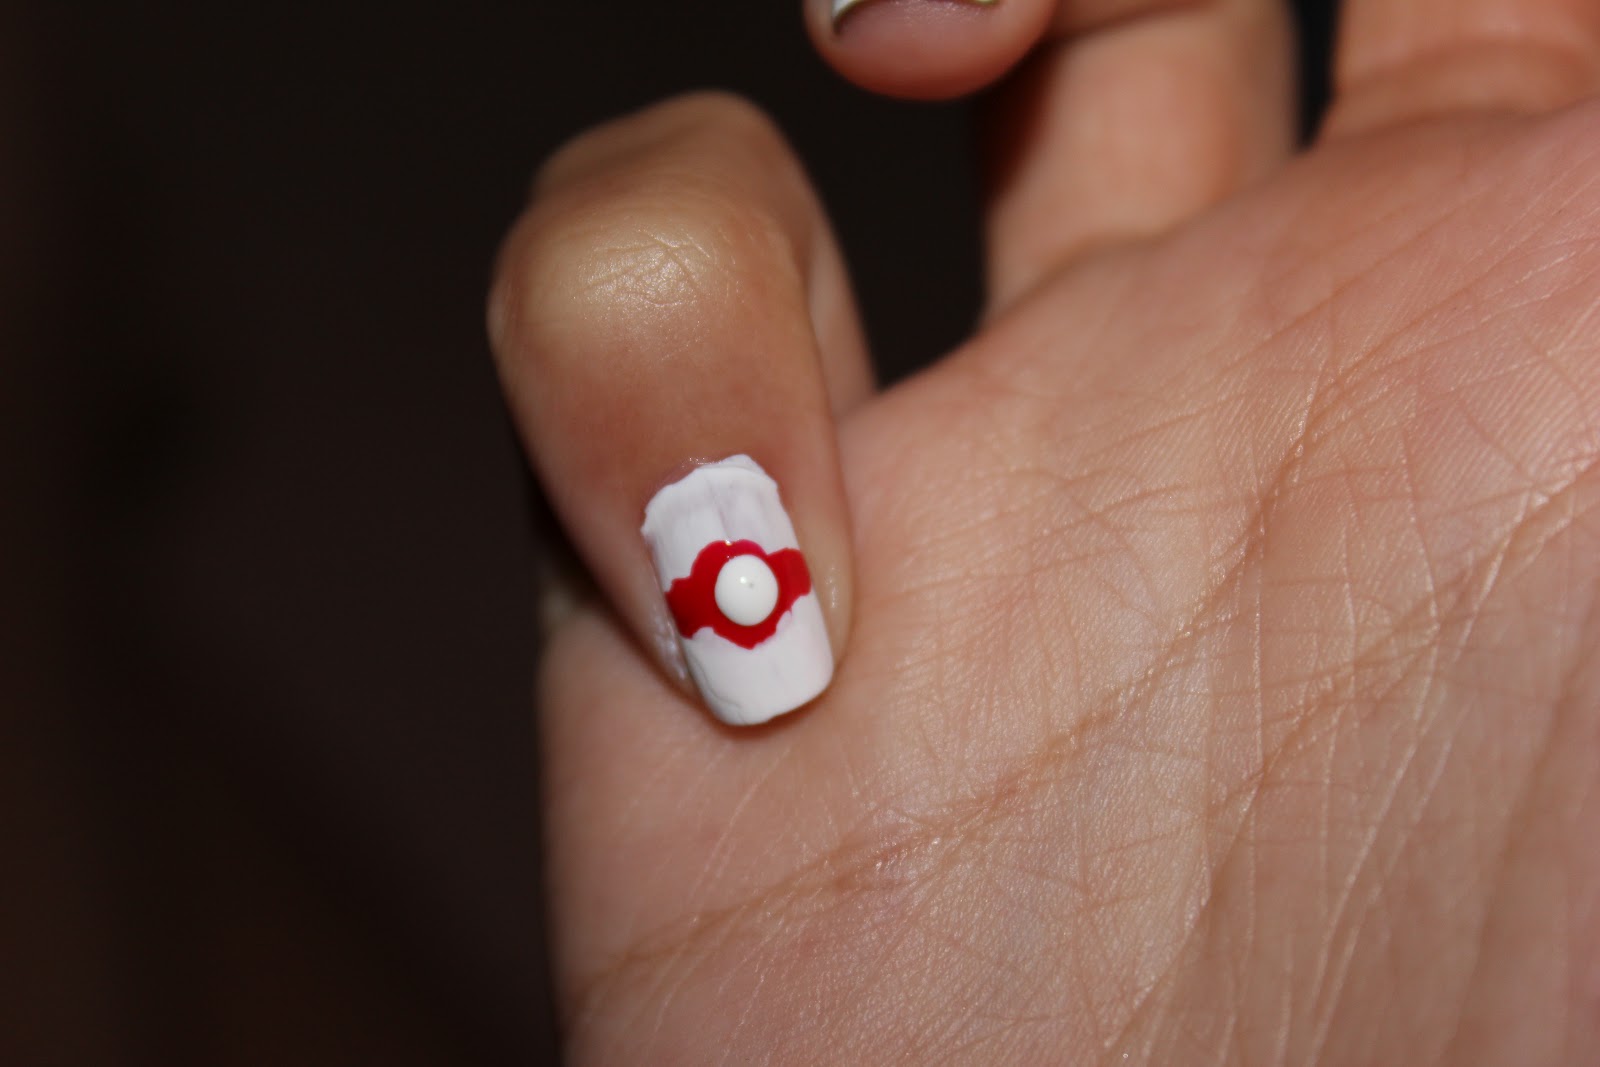
  • Premier Ball
    • Red - China Glaze Poinsettia
Step 1: Paint all the nails with the main colour of the top half of the pokeball.


Step 2: 
Great Ball - Paint two red rectangles on an angle going toward the middle, but does not reach the middle.
Ultra Ball - Paint 3 thin yellow lines that form a n on the black. The bottom does not need to be perfect since it will be covered later.
Net Ball -  Paint two x's side by side on the top half of the nail using black.
* i did not use a nail brush cuz i was lazy... but u should if you want it to look neater than mine... and you probably want that. But this shows you dont need to use a nail brush if u don't want too)


Step 3: Paint the bottom half of the nail white, i like to just brush the white polish downwards from the middle using the original brush the polish comes with. You can tape the top half then paint it white if you want but the boarder will be covered later, so it does not need to be perfect ;)


Step 4: Using the black polish and a nail brush, paint a line across the middle of your nail, then using the dotting tool, make a black circle in the middle of that line. For the premier ball use red polish instead of black.


Step 5: Using a dotting tool, make a white dot in the middle of the black circle (or red for the premier ball).


Step 6: Add your top coat and done!


THANKS FOR VISITING! (i wanna say watching but it was more like reading/looking and its kinda awkward for me to be like thanks for looking... and reading seems like its strange to say for the pictures....) Anyways, ur views are SUPER ULTRA appreciated!

-Tiffany o uo

P.S. srry for the making your web browser load all these pictures... but i am reaching the end of summer school so im super busy T^T plus i had to help Caitlyn with some "problems" so yea.... i havent had a proper night of sleep since last tutorial (though i admit that was like 3 days ago)

THHHAAAANNNNKKKKKSSSSSS again!

---caitlyn here: once again thanks tiff <3 i make up for it by editing all your tutorials so yea XD


16. Re Summer Update

hay guys ... errr maybe it's gurls but anyways that's not my point.

It's Caitlyn here, brought to you by my over thinking brain. XD Alright, so with Tiff posting sooo many things, i began to wonder if any of you wanted to know where I have been, or why i haven't been posting.

(Actually it may have only been me that's thinking that I haven't been posting XD)

Ummm, besides that, i just wanted to have a follow up from my last post.

SO i got a bf, nd it's person B i think (i dunno if that's right) but i became just friends with person A nd eventually my friend got him ;D but i don't think that was the point in my postings ...

...

I just realized that i don't remember why i started this post anymore ... crappp ...

OH WAIT!!!!  I remember now :D

Yea so back to the point. It's not that I'm never on this blog, it's the fact that i'm a lazy butt whose too tired after volunteering to update.

And don't think i'm never on, I always am.

So some of you may see Tiff's first posts, nd then later on, u see the same post but with less grammatical errors. So, WHO do you think the mysterious English checking ghost is? Yea that's right, it's MOI.

I apologize for never posting and keeping our readers hanging but don't blame me!!! :O BLAME TIFFANY XD I'm kidding. It's thanks to her that we have so many viewers ... so YAY!!!! ND LOVE YOU DARLING (<------ I'm referring to you, Tiff ... I'm not les either so don't think of me the wrong way ... no offense) FOR ALL THE FANS YOU'VE HELPED US CREATE!!!!!!!!!!!!!!! <3

:3 *sends online smooch to tiff* mmmMMMMMWAAAAAA !!!! heh heh, i'm so cute XD


ohh btw, LOVE ALL OUR READERS nd keep reading, my post will be up soon but here's another sneak peek :P


Pika Bal


rlli bad lighting but w.e.

Yet again not a tutorial just a little something to keep u guys on edge XD nd ummmm ... i'm weird BYEEEE!!

Lots-oh-love
Caitlyn <3

Tuesday 24 July 2012

15. Pokeball Nail

I know I know there are TONS of pokeball nail art all over the internet... But since im doing pokemon nails, a pokeball is a must. And since its on one of my 10 nails... I might as well do a tutorial XD


Polish:

  • Base and Top Coat
  • Red - China Glaze Poinsettia
  • White - O.P.I. Alpine Snow
  • Black - Eleanor
  • Nail dotter
  • Nail stripper
  • Tape
Step 1: Paint your nail with your base coat and then with red polish.


Step 2: Paint half of your nail with white. I like the pokeball to face outwards so i painted the edge. If you want you can use tape and stick it on where you want red.


Step 3: Don't be like me (i just used my polish's brush) and use a nail stripper to paint a black line between the white and red. Then use a dotting tool, and make a circle in the middle of the line.


Step 4: Dot a white dot in the middle of the black circle.


*Optional*
Step 5: Dot a black dot in the white, then another white dot in the black. Creating the button on the pokeball... I didn't do this because the white dot was really think and i didn't want a giant bump.

Step 6 or 5:  Top coat and completeee

Sorry i painted these with my left hand "-__-
Thanks for visiting

-Tiffany o uo

14. Charmander Nail

Number five! lets complete our left hand's set! well if your left handed than right hand's set... If your ambidextrous than whoaaaaa luckyyyy!!! i wish i could draw with both hands > _> you'll all see how bad my left handed nail art skills are in the next five...

Anyways, growing up, my favourite starter was always charmander... why? because i like dragons :3 and i think charazard is still my favourite pokemon BUT sadly the first gym was brock... rock type T^T and since i am always to lazy to train in the field between Pallet town and Pewter city... i ended up never choosing chamander *feels regret now* i think i've only choose charamder once out of the many times i played pokemone red, blue, fire red, leaf green.

Haha... enough about my failure to beat brock with charamder, lets get started!

Polish:


  • Base and Top Coat
  • Background - China Glaze Re-fresh Mint
  • Orange - Sally Hansen Xtreme wear Sun Kissed
  • Green - O.P.I. Green-wich Village
  • White - O.P.I. Alpine Snow
  • Black - Eleanor
  • Dotting Tool
  • Nail Art Brush
Step 1: Cover your nail in a base coat and then paint your nail with the background colour of your choice. I went with the same colour as my pikachu nail's background colour.


Step 2: Paint a semi-circle along the edge of your nail with the orange. This will be charmander's head. 


Step 3: With your dotting tool, paint two green dots for charmander's eyes. This will  be the bottom half of his eyes, so leave room for the rest of it.


Step 4: Again with the dotting tool, take the black polish and dot above the green dot making an oval. Also the green should look like a crescent.


Step 5: Now with a nail brush paint a mouth. (sorry mine is messy... i messed up a little)


Step 6: With you nail brush paint two teeth in charmander's mouth and then add dots to it's eyes.


Step 7: Paint on your top coat, and complete!!!


Hope your nails look better than mine! and you had fun painting them in the process ;)
Next are simpler designs since i had to use my left hand.... But we are 5/10! 50% done! half way there!

-Tiffany o uo

haha but i end up getting to trade my bulbasuar for a charamander after the first gym ;)


13. Squirtle Nail Art

theres five of them! hint hint wink wink
Okay! After a good night's sleep i can continue our pokemon nail tutorial marathon! Number 3 outta 10, is squirtle! Originally i was going to give him those cool squitle squad shades but maybe i'll save that for another time ;) Anywayssss lets begin!

Polish

  • Base and Top coat - i now some of you check the other tutorials
  • Blue - China Glaze Aubrey
  • Orange - Sally Hansen Xtreme wear Sun Kissed
  • White - O.P.I. Alpine Snow
  • Black - Eleanor
  • Dotting Tool
  • Nail Art Brush


Step 1: Base coat then your blue polish. Choose a blue with a hint of green.

Step 2: With the dotting tool, make a elongated white semi-cirlce for the two eyes


Step 3: Using a thin nail art brush ( i typically use a stripper ) paint on the mouth and two lines above the eyes. 
*tip* If you are having trouble with the mouth, paint a long curve then cover the middle with the blue. When it's dry paint in the "v" in the middle. 
*tip 2* i forgot to say this in the last ones but i add some nail polish remover to the black so that its a thinner consistency, this makes it easier to paint on ;)


Step 4: With the dotting tool fill in the bottom half of the eyes with orange.


Step 5: Once again with the dotting tool fill in the rest of the eye with black. Then add a tiny white dot with a tooth pick.


Step 6: Add your top coat and yourrrrr DONE!

check out the rest of the pokemon gang at the tutorial page
Thanks for you views! Just so you know, we all ways check or stats page, and are super excited to see our international viewers! also our fellow canadians :) Hope you enjoy painting the pokemon team o uo

-Tiffany > u<


Monday 23 July 2012

12. Bulbasaur Nail Art

Remember when pokemon looked like this
Number threeeeeeee..... i'm starting to run out of things to say in these intro thingys... Well, bulbasaur as we pokemon fans know, is number 1 on the pokedex... also part of the starter pokemons that started it all! So the next three tutorials are for the first generation starters, Bulbasaur, Squirtle, and Charmander!

Polish:

  • Base and Top coat... (u can tell im getting lazy... but the usual)
  • Green - O.P.I. Green-wich Village
  • Dark green - China Glaze Holly-Day
  • White - O.P.I. Alpine Snow
  • Red - China Glaze Poinsettia
  • Black - Eleanor
  • Dotting tool
  • Nail brush


i really like how bulbasaur turned out > u<

Step 1: Base coat and then the lighter of the two greens.


Step 2: Dot in two scalene triangles (haha asian math power... >_> not reli) but they kinda point inwards... look at a reference picture if needed. 

Step 3: Paint two black lines above the eyes, with a nail art brush. And the mouth... what you can do is paint a full wide slightly curved line then cover the middle with some green polish and add a "v" shape in the hole you created between the to line segments.... or paint it all at once

sorry step 2 and 3 have the same pic >_>
Step 4: With a dotting tool, make red pupils by filling in the white but leaving the corners white... errr look at the picture below... (its getting late and my brain is starting to move slower > n<)


Step 5: Using your nail brush, paint two white lines in the red, that extend from the top edge of the red to around the middle, or a little past the middle.


Step 6: Now paint the three or however many you want, splotch things bulbasuar has on his head and well... the rest of his body.

i just noticed i forgot nostrils... u can add them with black and nail brush
but i think this is just fine to " > u<
Step 7: Add your top coat and your done~~~

for those who dont know pikachu's on the thumb....
yes theres is a tutorial ;)
Thanks for the visit! I think this will be the last one i do today, but tomorrow i will continue! 
3/10 done :)

-Tiffany o uo